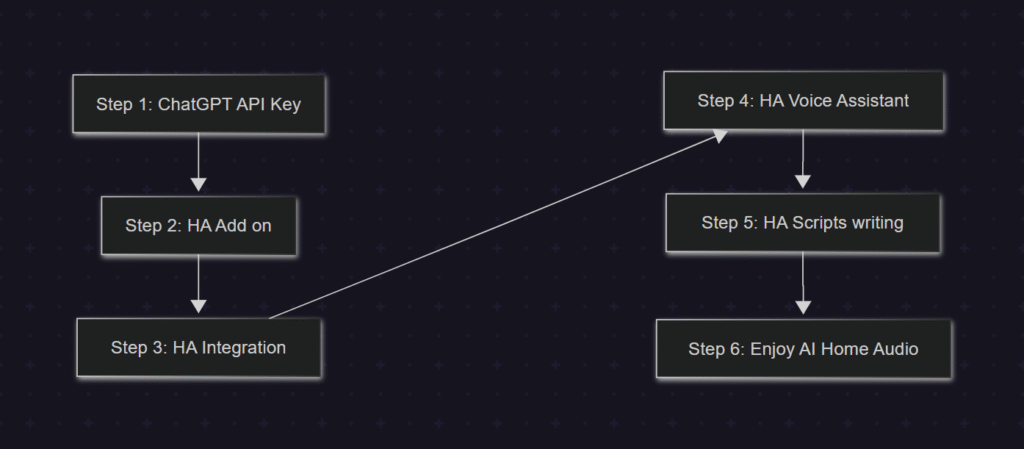
6 Steps to Control Your AmpVortex Amplifier with ChatGPT
Artificial Intelligence is gradually transforming our homes, and audio systems are no exception. With ChatGPT integrated into your Home Assistant setup, you can now interact with your AmpVortex amplifier in a natural, voice-controlled way. In this guide, we’ll walk through six practical steps to get you started. For simplicity, we’ll focus on controlling volume, but the same approach can be extended to advanced features such as EQ adjustments, source-to-zone routing, muting/unmuting, and selecting different input sources.
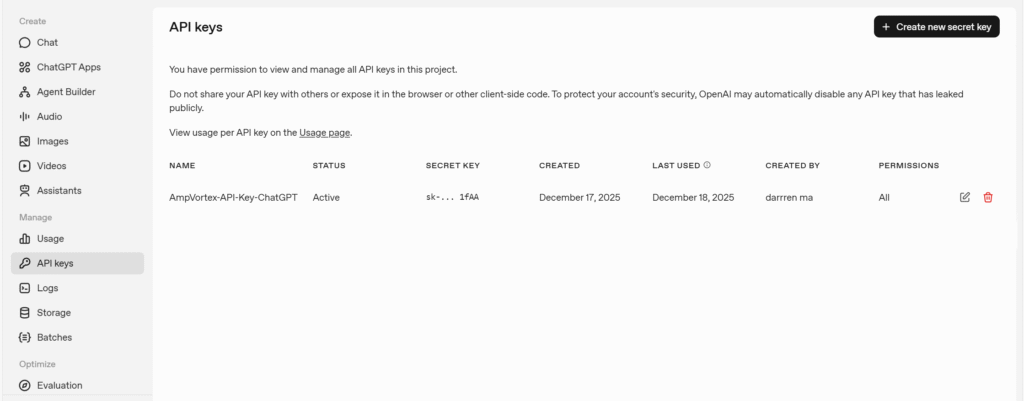
Step 1: Prepare Your ChatGPT API Key
The first step is to obtain a ChatGPT API key from OpenAI. This key allows Home Assistant to send requests to the GPT model and receive AI-powered responses. Make sure you store your key securely, as it is the credential that enables your smart home system to communicate with ChatGPT.
Step 2: Install Home Assistant Add-ons
Next, you’ll need three key Home Assistant add-ons:
- OpenWakeWord – This handles AI processing for understanding your commands and generating responses.
- Whisper – This converts your spoken commands into text so ChatGPT can interpret them.
- Piper – This converts ChatGPT’s text responses back into natural-sounding speech.
These three components together create a full voice interaction loop for your home audio system.

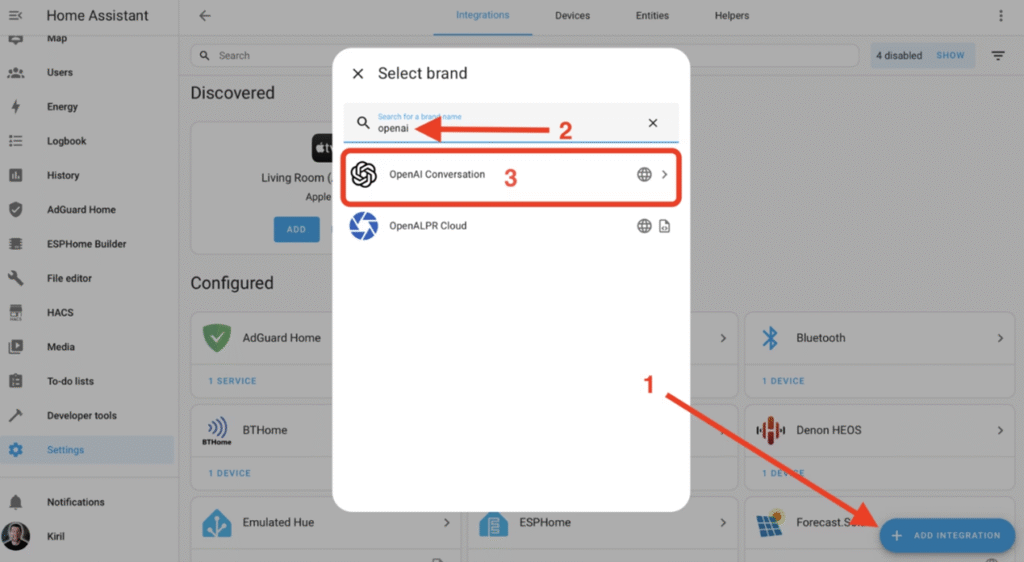
Step 3: Integrate the Add-ons into Home Assistant
Once installed, each add-on needs to be integrated into Home Assistant:
- ChatGPT integration allows Home Assistant to process AI requests.
- Whisper integration captures and converts your spoken words into text commands.
- Piper integration enables your system to speak responses back to you.
Proper integration ensures that your voice commands reach the AI model and that the system can respond audibly.
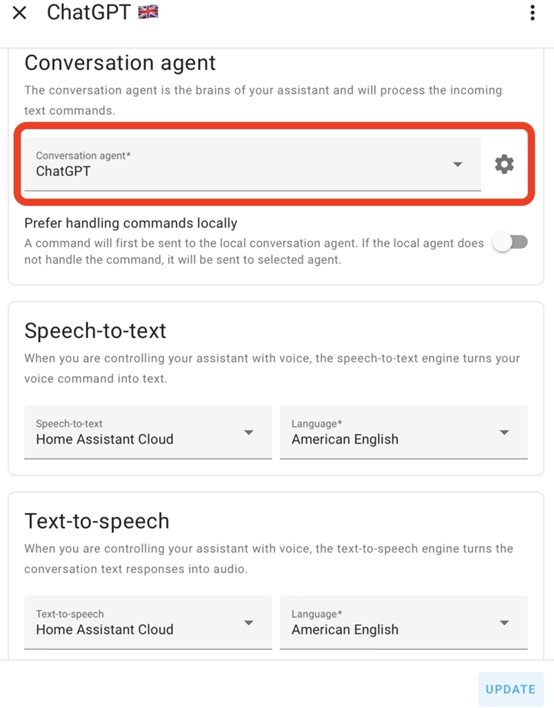
Step 4: Configure Home Assistant Voice Assistant
With the add-ons in place, configure the Home Assistant Voice Assistant to manage these components. This step includes:
- Selecting the default speech-to-text engine (Whisper)
- Selecting the default text-to-speech engine (Piper)
- Mapping ChatGPT as the command processor
This setup allows you to speak naturally to your home system, with AI understanding your intent and taking action on your devices.
Step 5: Write Scripts to Control AmpVortex
Now comes the fun part: writing scripts to control your AmpVortex amplifier. For this article, we focus on volume control. You can create a script that takes the AI’s interpreted command, extracts the desired volume, and sends it to the amplifier.
For example, saying “Set the living room volume to 30” can be processed by ChatGPT, converted into a JSON command, and executed by Home Assistant to adjust the AmpVortex amplifier.
Later, you can expand your scripts to include:
- EQ adjustments to customize sound for different rooms
- Routing audio sources to multiple zones
- Mute/unmute controls
- Selecting input sources such as Spotify, AirPlay, or USB
The possibilities are only limited by the commands you script and the AI’s understanding.
Step 6: Enjoy AI-Powered Home Audio
With everything set up, your AmpVortex amplifier is now voice-controlled and AI-enhanced. You can simply speak your requests, and ChatGPT will process them and adjust your audio environment in real-time.
This setup transforms a traditional amplifier into an intelligent, interactive system. Over time, you can add more capabilities, refine voice commands, and even integrate multi-room audio, creating a fully immersive AI-driven home audio experience.
Final Thoughts
Integrating ChatGPT with AmpVortex via Home Assistant is just the beginning. Once you’re comfortable with basic volume control, you can expand your system to handle complex tasks, turning your smart home audio setup into a truly intelligent entertainment hub.
By following these six steps, you’re not just controlling an amplifier—you’re stepping into the future of AI-powered home audio.
Appendix: Why Whisper & piper need two steps, while ChatGPT need integration
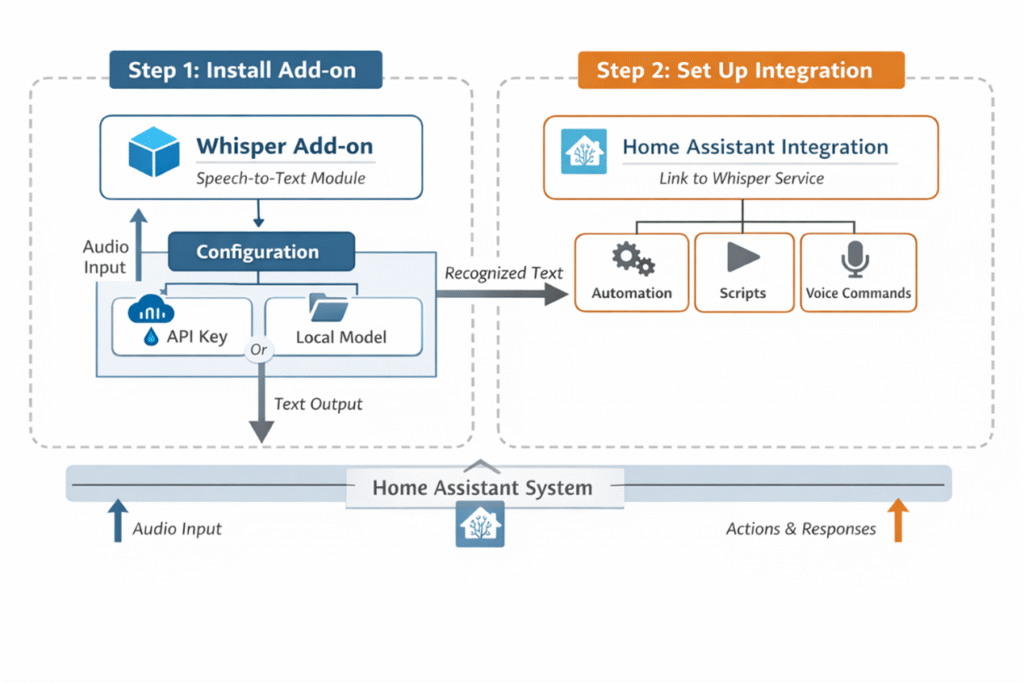
For Whisper (OpenAI’s speech recognition model) in Home Assistant, there are usually two steps:
Add-on Stage
First, install the Whisper or related speech recognition Add-on.
This Add-on essentially runs the Whisper model within the Home Assistant environment, allowing it to receive audio input and generate text output.
At this stage, you usually need to configure an API key (if using OpenAI’s cloud service) or specify a local model path.
Integration Stage
After installing the Add-on, integrate it into the system via Home Assistant’s Integration.
This allows you to call Whisper for speech recognition within Home Assistant automations, scripts, or other services.
The Integration enables Home Assistant to “recognize” the Add-on’s functionality, making it available in the Dashboard, automations, or other components.
Simply put: the Add-on is the “server”, and the Integration is the “client interface”.
Summary:
1️⃣ Whisper / Piper — Add-on + Integration
- Add-on: Runs the model or service on Home Assistant or a local server.
- Integration: Lets Home Assistant recognize the service so it can be used in automations or scripts.
- Note: The Add-on must exist first as the server, then it can be accessed via Integration.
2️⃣ ChatGPT — usually only Integration
- ChatGPT is a cloud service, so Home Assistant can directly call the API via the official OpenAI ChatGPT Integration.
- No Add-on is needed because the model doesn’t run locally; the Integration alone can communicate with OpenAI’s service using the API key.
Here’s a concise table comparing Whisper/Piper and ChatGPT in Home Assistant:
Feature / Step | Whisper / Piper | ChatGPT |
Add-on required? | ✅ Yes — runs the model/service locally or on server | ❌ No — cloud service, model runs remotely |
Integration required? | ✅ Yes — lets Home Assistant recognize and use the Add-on | ✅ Yes — official OpenAI ChatGPT Integration to call API |
Purpose | Speech recognition (audio → text) | Conversational AI / text generation |
API Key needed? | Optional — if using OpenAI cloud model | ✅ Required — to access OpenAI API |
Local model path? | Optional — for local model usage | ❌ Not applicable |
Usage in automations/scripts | ✅ Via Integration after Add-on installation | ✅ Directly via Integration |